
Section 1
Introduction
Your success as a business owner hinges on your ability to attract new customers, build a brand, and reap the rewards by driving sales. But selling on marketplaces like Amazon and Flipkart won’t help you in all these areas. On the surface, it may seem like a lucrative idea to sell on Amazon and Flipkart because they give you an easy start, but for long-term success, it’s better to branch out.
The truth is that when you sell products exclusively through marketplaces like Amazon, you’re missing out on a lot of opportunities.
You win the sales, Amazon wins the customer
The biggest disadvantage of selling on Amazon is that you lose the opportunity to brand yourself. You may win the order, but Amazon wins the customer in the long run. Your products are shipped to the customer in Amazon’s packaging, while your brand name is nowhere to be seen.
Zero control
A lack of control over product displays and customer shopping experience will likely take a toll on your revenue. Your best-selling and latest products don’t get enough visibility on Amazon, which kills yours chances of maximizing your potential sales.
No brand loyalty/repeat purchases
Since there’s no branding opportunity for your products, Amazon takes all the credit for your sales. Happy customers will go to Amazon and buy similar products there, likely from one of the thousands of other resellers selling the same thing. What are your odds of winning the next sale? On Amazon, your product becomes a commodity, costing you repeat purchases.
Fewer opportunities for product improvement
A lack of customer support for your products on Amazon also eliminates the possibility of interacting with your customers. If you’re unaware of your customers’ queries, you can’t offer customer-centric products, so you lose the chance to improve your products.
Dead end
Though Amazon gives your business a head start, its policies are constantly changing. At any time, you may be penalized for something you have no control over, which means you can lose your business overnight.
There are several downsides to selling on Amazon, but that doesn’t mean you shouldn’t sell on marketplaces at all. It simply means that as an online merchant or small business owner, you shouldn’t depend entirely on a third-party website for your bread and butter.
A better long-term strategy is having an alternate platform where you can build a brand, make more profits, and have 100% control over your business. Aside from selling on marketplaces like Amazon and Flipkart, you should sell your products on your own eCommerce website and display your products on Google.
With the help of Google Shopping Ads, you can display your products directly to potential customers and avoid marketplace fees while also focusing on content marketing and SEO to drive traffic organically. In the following guide, we will walk you through what Google Shopping is and how you can advertise on Google to sell your products instantly.
Section 2
What is Google Shopping and How Does It Work?
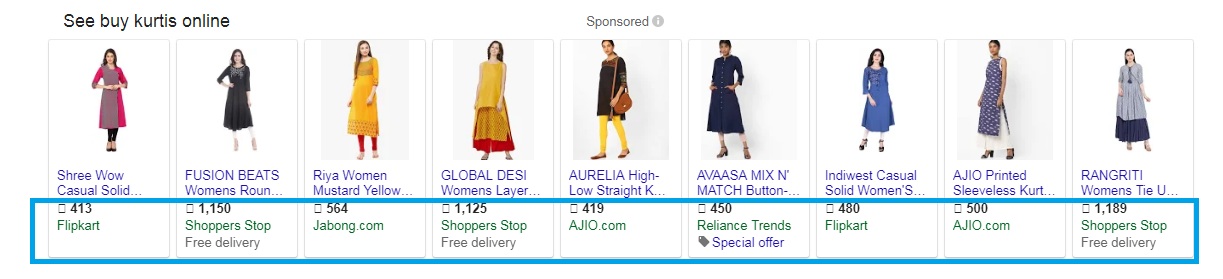
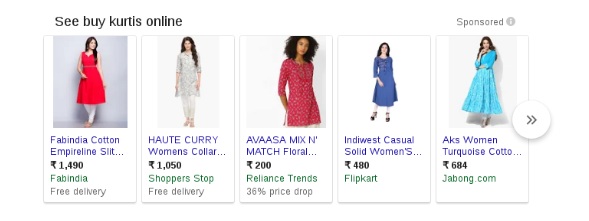
Google Shopping is exactly what it sounds like: a shopping search engine by Google. It helps Google users find products advertised by merchants on their stores.
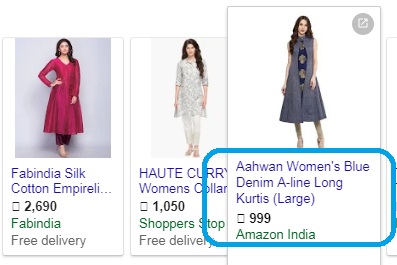
When a potential customer searches for a product, Google Shopping Ads are displayed at the top or upper right of the search result page. Standard AdWords text ads are also shown, but Google Shopping Ads display more detailed product information, such as product image, color, name, and price. Because of this, Google Shopping Ads have a higher click rate than AdWords text ads.
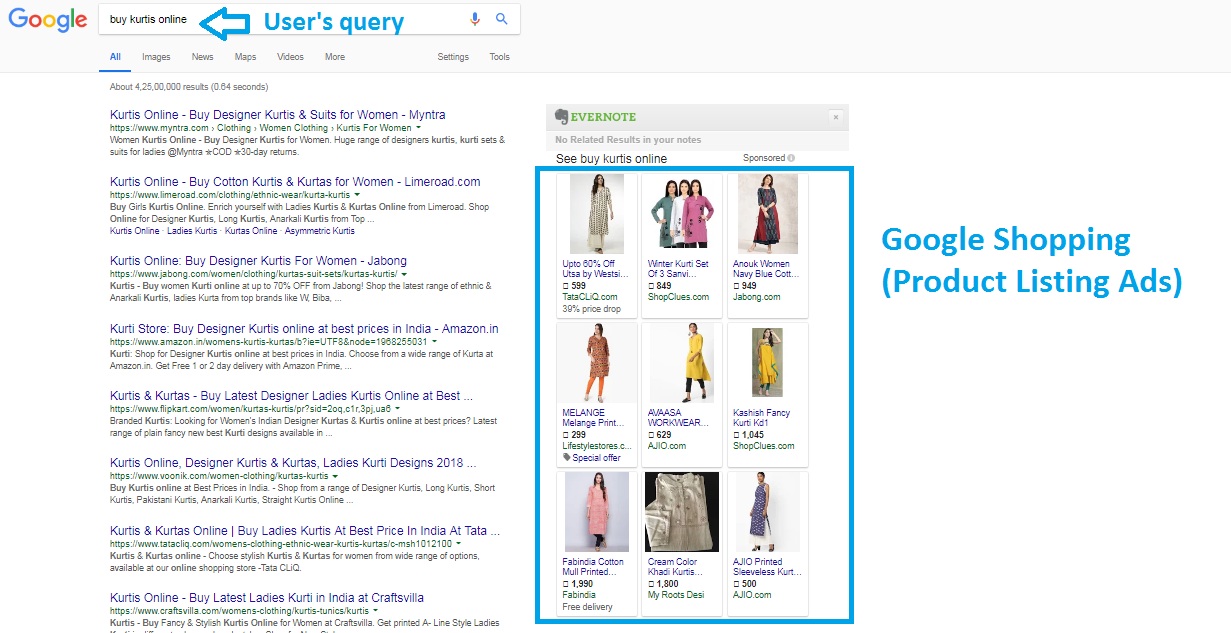
Thanks to Google Shopping Ads, users can purchase a product directly through a Google search. Clicking an ad will take them straight to the respective seller’s eCommerce website. You’ll be charged per click based on the bid you set.
Google Shopping Ads are one of the best ways to drive relevant traffic to your store and achieve sales. Research has shown that these ads generate higher conversation rates than traditional AdWords text ads, as seeing product details and images entices more users to click on a shopping ad.
How Does Google Shopping Work?
Now that you know what Google Shopping is, let’s dive into how Google Shopping works.
Google Shopping is powered by two platforms: Google Merchant Center and Google AdWords. Google Merchant Center is where you upload your product feed, while AdWords is where you set your budget, adjust your bids, set negative keywords, and schedule your ads.
Unlike traditional text ads, which display your website around the keywords you choose, Google Shopping Ads are triggered based on your product feed and bid. We’ll get into the details of setting up your product feed and placing bids in later sections.
Section 3
Competition and Goals
Your ads are most likely to be influenced by your competitors and the goals you’ve set for your business. Let’s take a closer look at both these aspects.
Competition
Learning more about your competitors and their bidding strategies will tell you how fierce the competition is. There are two tools available to help you find your competitors, their bids, and their top ads.
Manual searches
The easiest way to find your competitors is by doing a Google search for a keyword related to your products. Make a note of all the competitors, products, and prices that pop up.
SEMrush

Using SEMrush, you can find your competitors’ top Google Shopping Ads. You’ll see a detailed report under “PLA Research” with ad details such as title tags and prices. Note that the full version of this tool isn’t free, but you do get 10 free searches every day. Use these searches wisely to help you make the best decisions when setting up your own Google Shopping Ads.
With these tools, you’ll have a fair idea of the competitive landscape you’re getting into. More importantly, you’ll know how much you need to pay per click, which will help you determine your daily budget.
Goals
While setting up Google Shopping Ads in AdWords, you’ll be asked to define your goals. Google will use this information to help you achieve them, but be aware that if you’re just starting out, your goals may differ from the goals of a two-year-old business. Here’s why:
Driving Sales or Awareness
Though your ultimate goal is to drive sales, you first need to generate awareness of your brand by attracting new customers. This is important because you want to foster trust with your potential audience. A two-year-old business, on the other hand, may focus primarily on driving sales, so their bidding strategy won’t be as aggressive as yours.
When you set up your ads in AdWords, you’ll be required to set a goal. Ask yourself, “What exactly am I trying to achieve by running this campaign?”
Sales
Aligning your campaign with a sales goal will help you drive sales to your store. This goal recommends settings and features to help you reach customers who are already ready to buy.
Website Traffic
The website traffic goal recommends settings and features to help you drive relevant customers to your website. This is a good option for startups, as driving relevant traffic to your stores and creating brand awareness should be your primary goals. This is also important in the long run as it helps you establish a trustworthy brand.
Cost of Customer acquisition
How much are you willing to spend to close one deal? Or, in other words, what percentage of your profits are you ready to shell out to gain a loyal customer?
Initially, your focus shouldn’t be on customer acquisition because you’re still generating brand awareness. Once your ads have reached a significant conversion rate, you can change your goal to sales and calculate your cost per acquisition.
For example, if the average value of orders on your store is Rs. 500 with a profit margin of 20% (Rs. 100), how much would you be willing to spend on closing a deal? You need to figure out what figure you’re comfortable with before you commit to a budget.
To help you in that area, we’ll talk more about setting budgets and bids in the “Bidding” section below.
Section 4
Bidding and Budget
If you’re new to Google Shopping Ads, bidding will mostly be guesswork. You won’t know your ideal budget or max CPC when you first start out. Bid too much and it will kill your efficiency and ROI, but bid too little and you won’t get enough exposure and traffic. So how do you find the sweet spot to trigger your ads for the right queries?
Simple: use automated bidding!
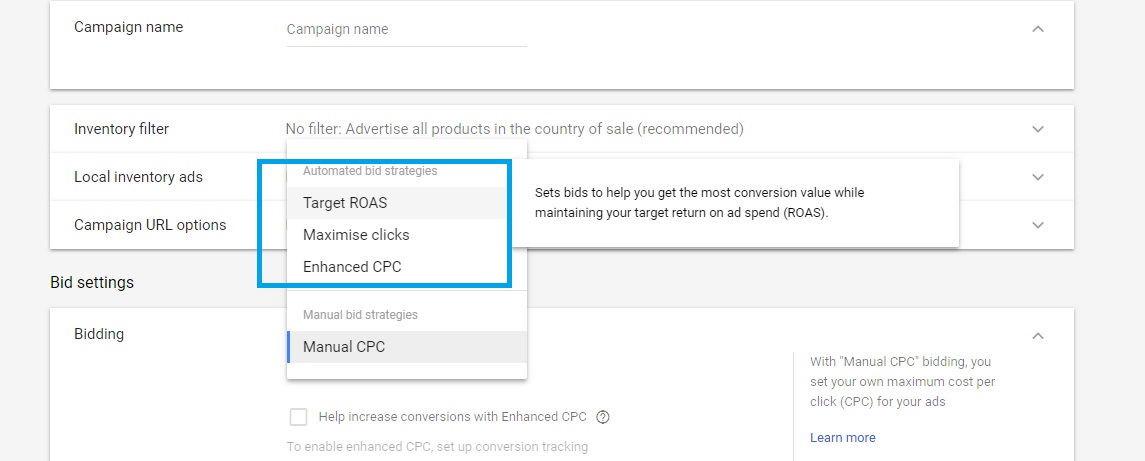
Automated bidding is a process designed to maximize the potential of your Google Shopping Ads. Google analyzes ad performance data—gender, device, time of day, operating system, etc.—and optimizes your ads based on that criteria.
In the beginning, let Google decide your bidding sweet spot. Once your campaign ends, analyze the ad performance data and set your max CPC bids based on the information you find.
Formula to set your CPC
Before we get to the formula, it’s important to understand the approach behind it. There are two things to keep in mind while bidding: profit margin and conversion rate. You should already know your profit margin; however, the conversion rate is only possible to determine after you start running Google Shopping Ads using automated bids.
When you run ads for the first time, consider it an experiment to determine the ballpark range of your conversion rate. Once you determine your conversion rate, you can use the formula to optimize your bids.
Selling Price – Cost = Profit
Profit X Conversion Rate = Max CPC
Max CPC X (0.5 to 0.6) = Initial Bid
Note: 0.5 to 0.6 is half of your max CPC and can vary a little depending on your profits and budget.
Here’s an example to help you better understand how setting bids works.
You’ve just finished your campaign and found that your conversion rate is 3% (i.e. you get three sales for every 100 clicks). The cost to make your product is Rs. 250 and you’re selling it for Rs. 400. Therefore, your profit on each sale is Rs. 150.
Profit = 400 – 250 = Rs. 150
Max CPC = 150 X 0.03 (3 conversions/100 clicks) = Rs. 4.5
Initial Bid = 4.5 X 0.5 = Rs. 2.25
Once your first campaign is done, you’ll have a much better idea how high to set your bids and budget.
Setting a budget
The first time you run a campaign on Google Shopping Ads, Google will show your ads conservatively to see how users respond to them. In this case, if your budget is low, you may not get many impressions or clicks.
For example, if your average CPC is Rs. 10 and your budget is Rs. 200, the maximum number of clicks you can expect is 20 before your budget runs out and Google stops showing your ads. There’s also a good chance your first ad campaign will produce a lower conversion rate. Therefore, it’s best to give your campaign some room to grow, which will help you determine your real conversion rate over time.
Section 5
All About the Google Shopping Feed
Setting up your feed correctly is important for several reasons. As we said earlier, Google Shopping Ads are not triggered by keywords but by the product feed you upload to Google Merchant Center. To set up a feed, you simply need to structure the information about the products you want to advertise through Google Shopping. Google then fetches that information from Google Merchant Center to display your ads.
Your product feed is the DNA of your ads. Google crawls your feed and determines if your products are relevant for a search query. Therefore, you need to properly structure your feed so that Google can display your products beside relevant search results.
While setting up your feed, there are a few key elements you need to get right to avoid losing valuable traffic.
Image
If you want potential customers to click on your Google Shopping Ads, it’s important to include clear pictures of your products.
Use white or light-colored backgrounds to create a contrast with your product. If you sell clothing items, make sure they’re modeled on people who resemble your target audience. Also be sure to consider lighting and angle when taking pictures. Don’t forget to research your competitors’ ads for inspiration!
Brand
It’s important to include a brand name with your products, whether it’s your own name or a seller’s. Sometimes users search for products by brand, so this will expand your reach. If the brand is yours, this will also help you generate brand awareness.
Price
Price is the most influential factor in conversion rates. If you’re selling the same products as your competitors, obviously the lowest price will win the sale. That’s why it’s a good idea to study your competitors’ products and pricing. Don’t undersell everything, though; for in-house brands, handmade products, and exclusive products, you can set higher margins.
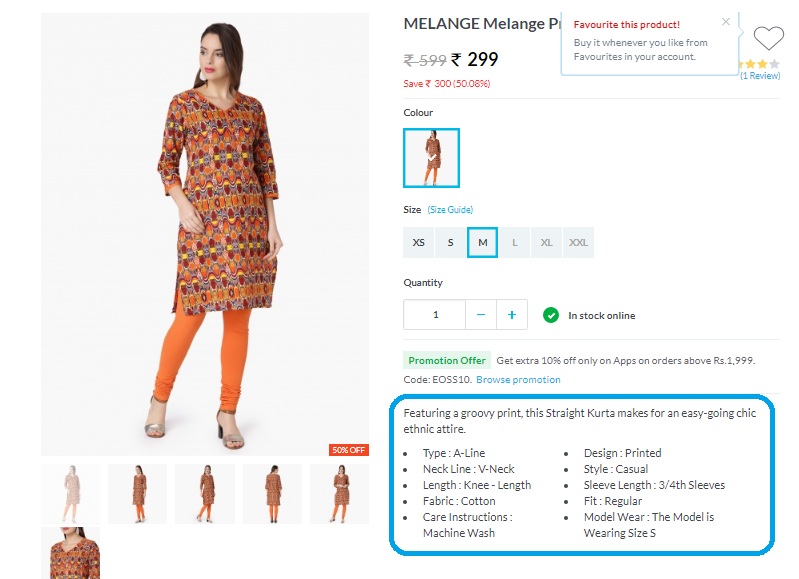
Product title
Google crawls your products by title. Therefore, an accurate, descriptive, SEO-optimized product title is vital. Your product title should include SEO keywords, as these will prompt Google to display your ads. However, you should only use keywords that are relevant to your products. Don’t keyword-stuff your titles or use highly searched keywords that have nothing to do with your products. This will only lower your relevant traffic and conversion rates.
The length of a search query is directly related to the buyer’s intent—if the buyer types in a long search query, they clearly intend to buy that product. Therefore, it’s important to indicate details whenever applicable, such as brand, color, and size.
Here’s an example of a good product description:
Product description
The product description in a Google Shopping Ad serves two purposes:
1) to trigger ads for relevant queries on Google search result pages (keyword optimization), and
2) to help your users make an informed decision.
Many websites don’t have product descriptions, which can reduce the chances that a potential customer will buy a product. Other websites have descriptions that are overflowing with flowers and rainbows but lack product features and benefits. Your best bet is to get straight to the point with concise yet informative descriptions.
And don’t forget the focus keywords!
Here’s an example of a product description:
Product category
Choosing a product category is necessary if you want your ads to appear in the right searches. You don’t get to choose just any category, though; Google already has an established list.
Sometimes your products won’t fall under any Google categories. In these rare cases, choose a category that’s as close as possible to your products and let your titles and descriptions do the rest.
How to Set Up a Google Shopping Feed
Now that you have a better understanding of how to set up product details, let’s dive into how to upload them to Google Merchant Center.
If you only have a few products on your website, it’s better to create a feed using Google Spreadsheet. If you have hundreds of products to advertise, though, manually adding your products to Google Merchant Center is out of the question.
There are multiple ways to upload a product feed. If you’re using a ShopShastra WooCommerce platform, you can upload it using a plugin.
There are several plugins you can use to export your product feed to Google Merchant Center. We recommend WooCommerce Google Feed Manager.
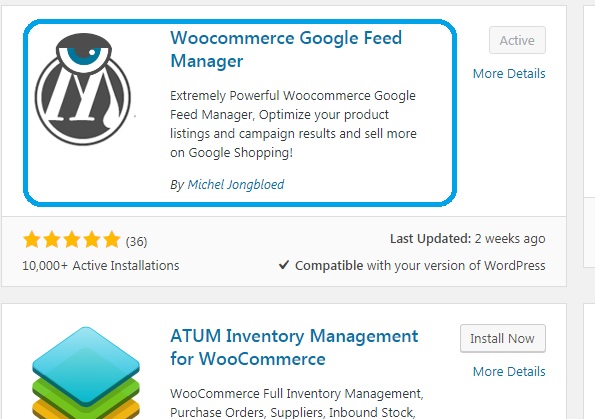
With this plugin, you can map your products under Google’s categories and subcategories. You can also use the “Update Schedule” option to update your feed automatically whenever you make any changes.
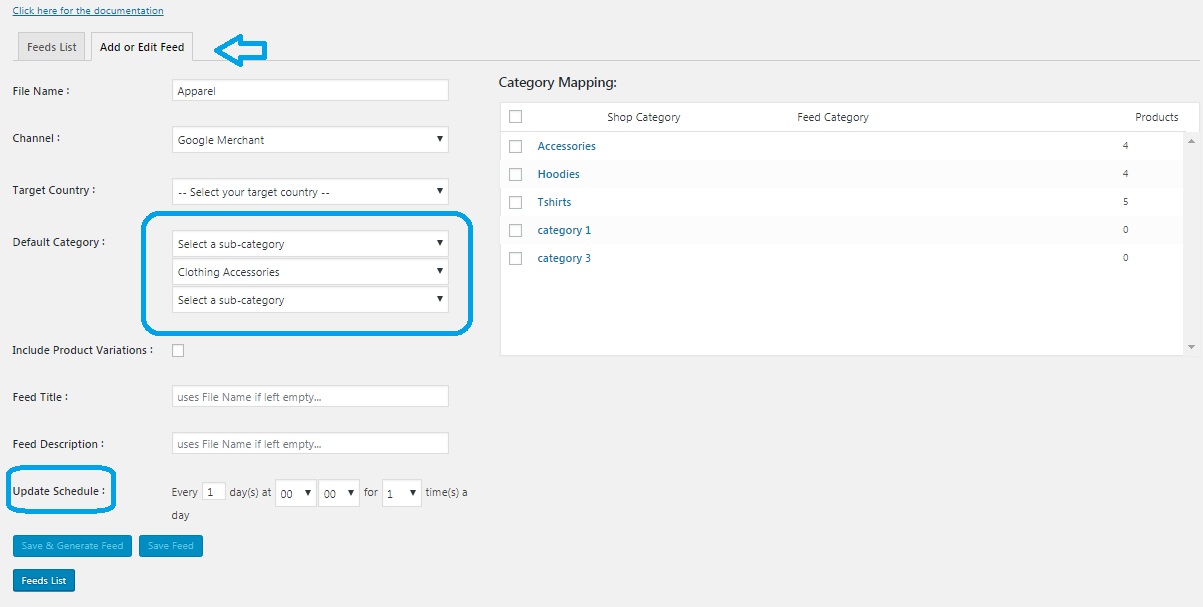
Once you’ve updated your feed, the plugin will generate an XML file.
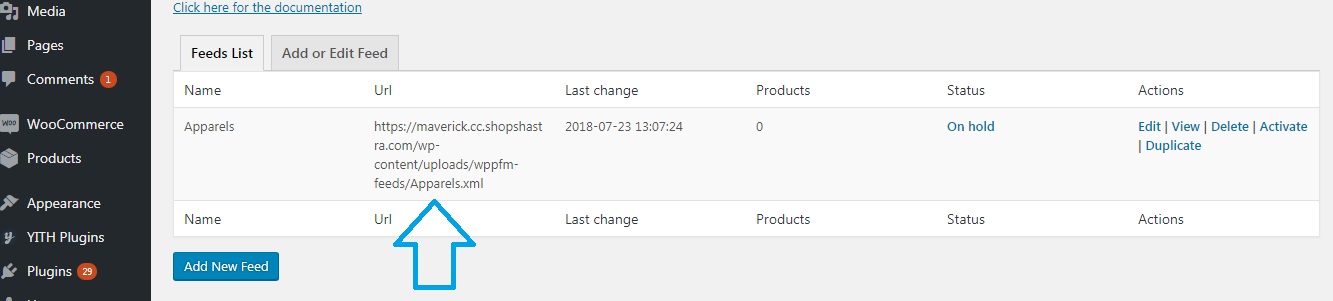
Go to “Products” and click on “Feeds” in your Google Merchant Center account.
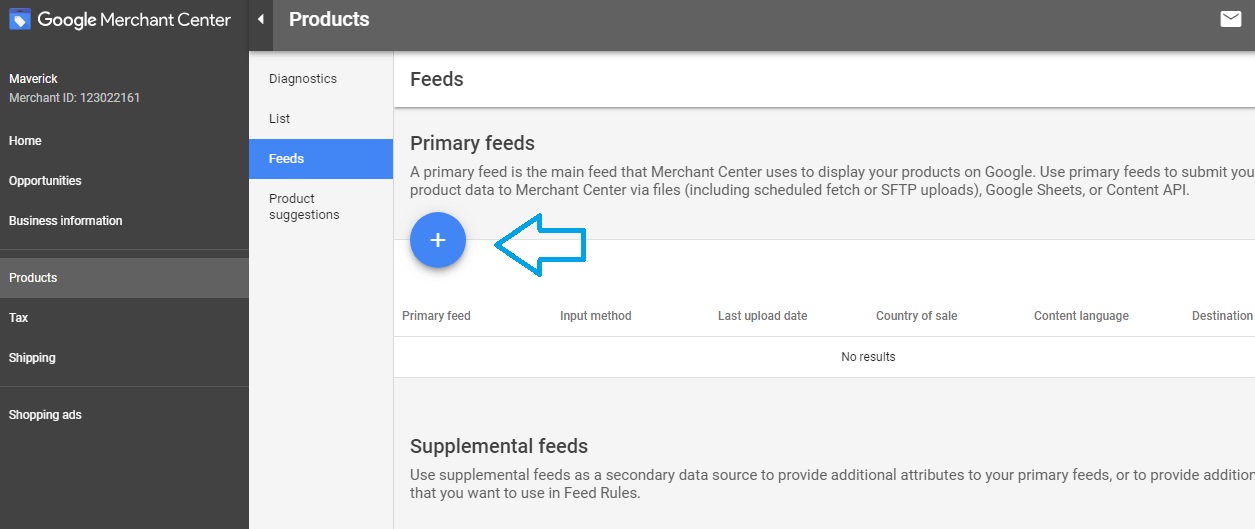
Add a new feed.

Select “Schedule Fetch”.
For an optimal user experience, your product feed must be updated regularly so it reflects accurate product information and pricing while running Google Shopping Ads. By selecting “Schedule Fetch”, Google automatically fetches your local feed based on the frequency you set.
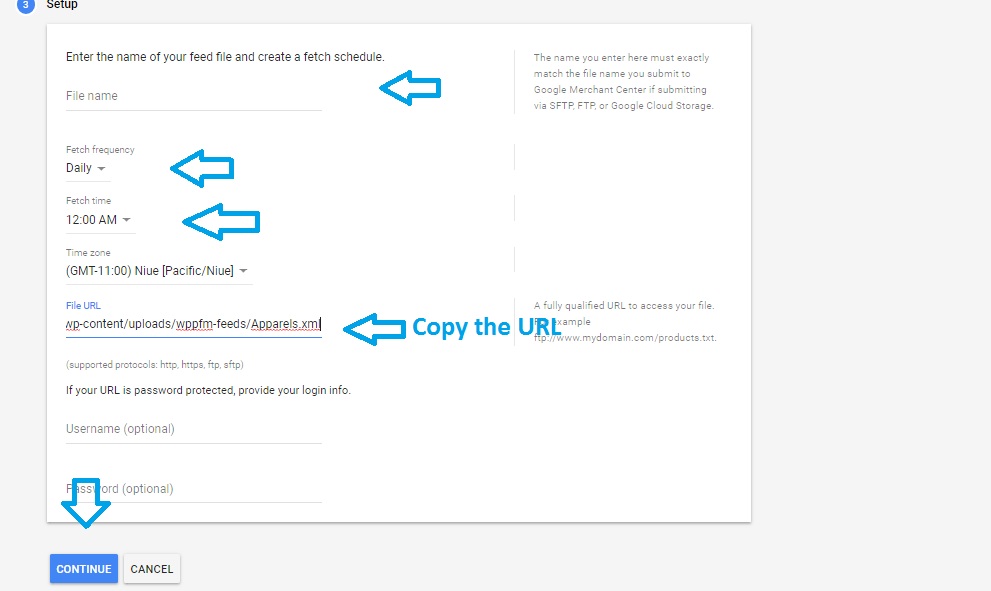
Enter the file details and upload the URL. Save that file and the product feed will immediately export to Google Merchant Center.
So far, we’ve gone over competition, goals, bidding, budgeting, and setting up your feed. Now it’s time to apply everything you’ve learned so far into setting up your first ad campaign!
Section 6
Account Creation and Setting Up an Ad Campaign
To run Google Shopping Ads, you need to create two accounts: an AdWords account and a Google Merchant Center account.
Google Merchant Center account
As we said earlier, Google Merchant Center is the platform where you upload your feed, which is a collection of products in a format that Google can fetch from your website.
Once you sign into your Google Merchant Center account, you’ll need to configure the following settings.
Verify and claim your website URL
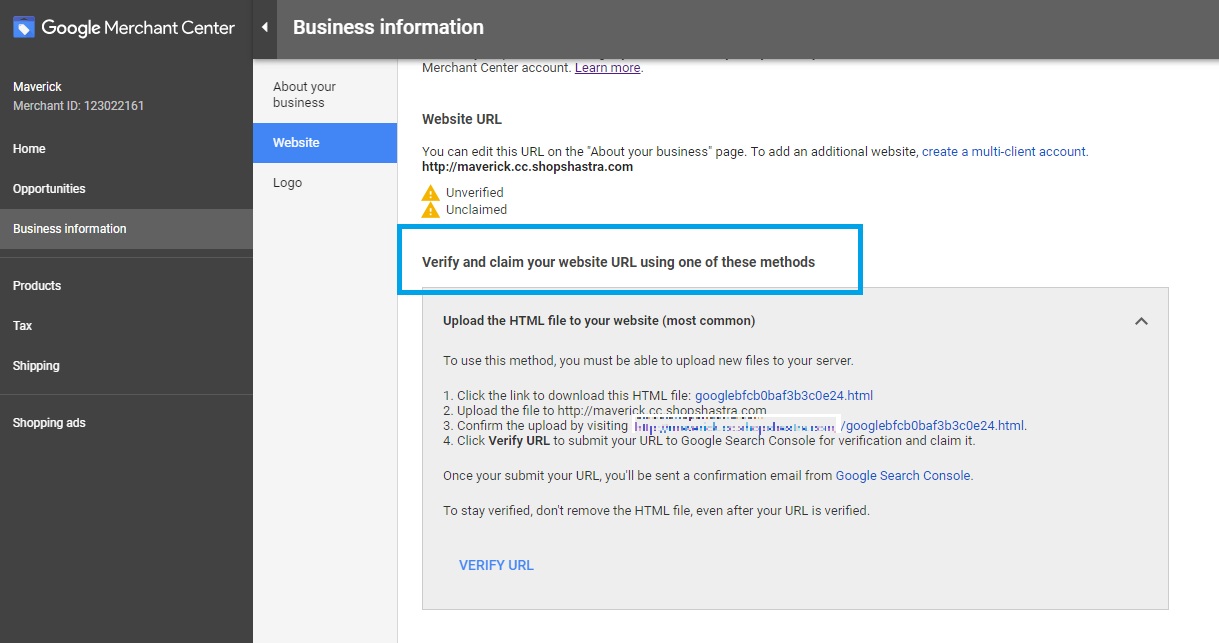
Google Merchant Center needs to know that you own the shop you’re setting up. There are multiple ways to verify your website, but the simplest and most common method is to upload the downloadable HTML file in the header section of your website.
Link your Merchant Center account to AdWords
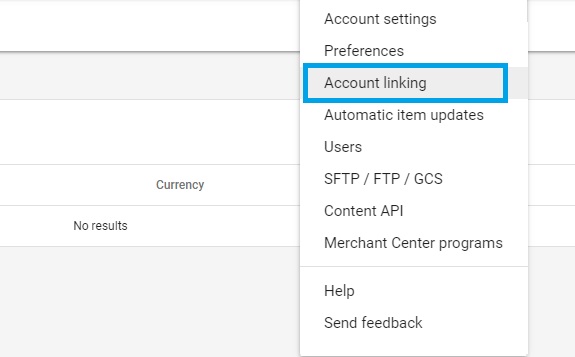
AdWords is the platform where you’ll create your campaign and set your bids and budget to run your Google Shopping Ads.
Go to “Settings” and click on “Account Linking”, then input your 10-digit AdWords customer ID to link your accounts.
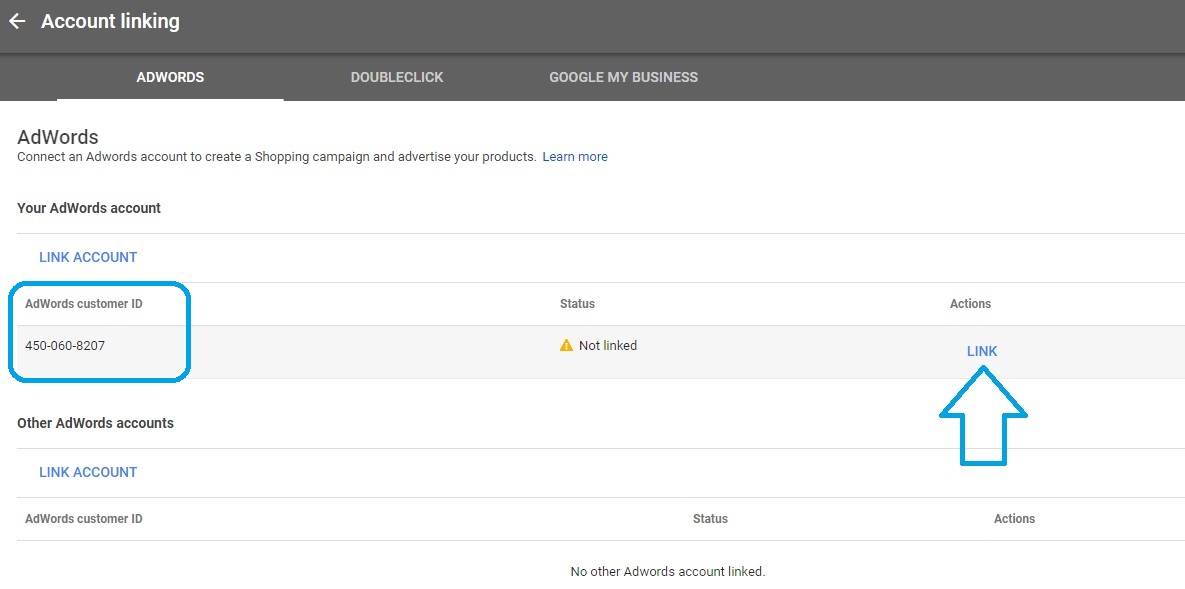
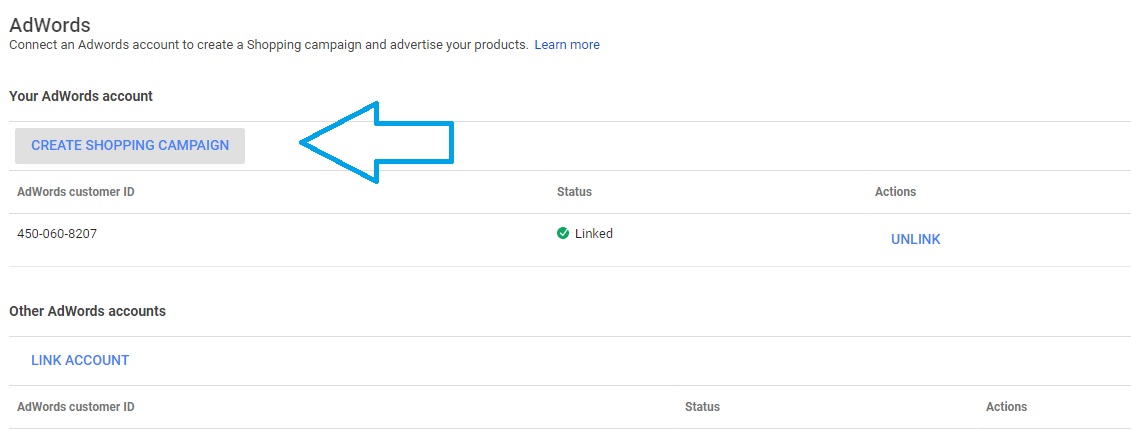
Once your account is linked, you’ll be redirected to AdWords to create a campaign.
Note: If at any point you get stuck creating an AdWords account, you can refer to this guide from Google.
Google AdWords
Setting up a campaign in AdWords is easy. All you need to do is fill out the details. Let’s go through how to create one step by step.
Click on “Create Shopping Campaign”.
Select “New campaign”.
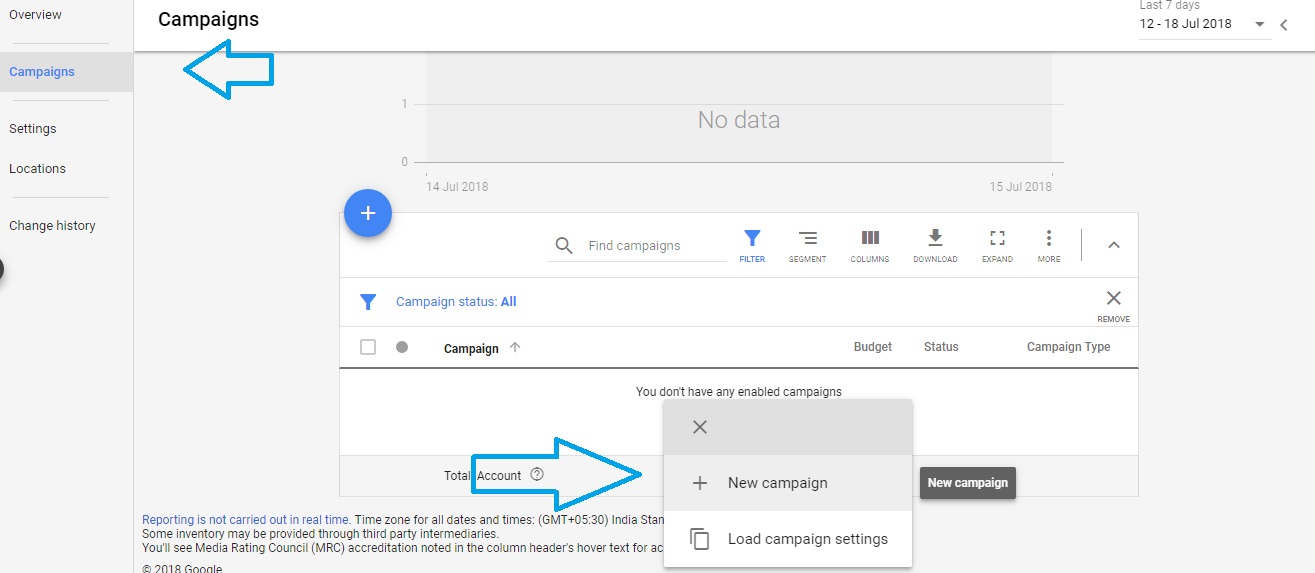
Select “Shopping Campaign” and choose a goal (refer back to Section 3 for more information about choosing a goal).
You’ll use different settings and features depending on your goals.
- The sales goal helps you reach customers who are already ready to buy.
- The leads goal helps attract customers to your business.
- The website traffic goal helps drive customers to your website.
Selecting a goal is optional, but if you’re just getting started, it’s best to set a goal so you can stay on track towards your objective.

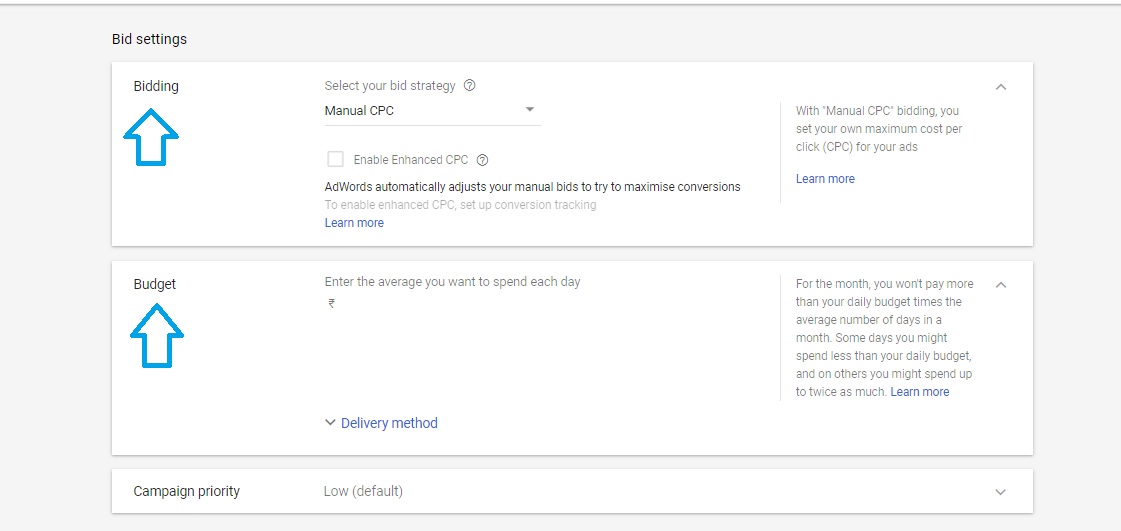
Bidding and Budget
Configuring your budget and bidding settings is without a doubt the most important step in running Google Shopping Ads, so you need to pay it special attention.
Set your delivery method to Standard. This way, Google will spend your budget evenly over time, as opposed to the Accelerated delivery option in which your budget will run out too quickly. When starting out, it’s better to adopt a conservative approach.
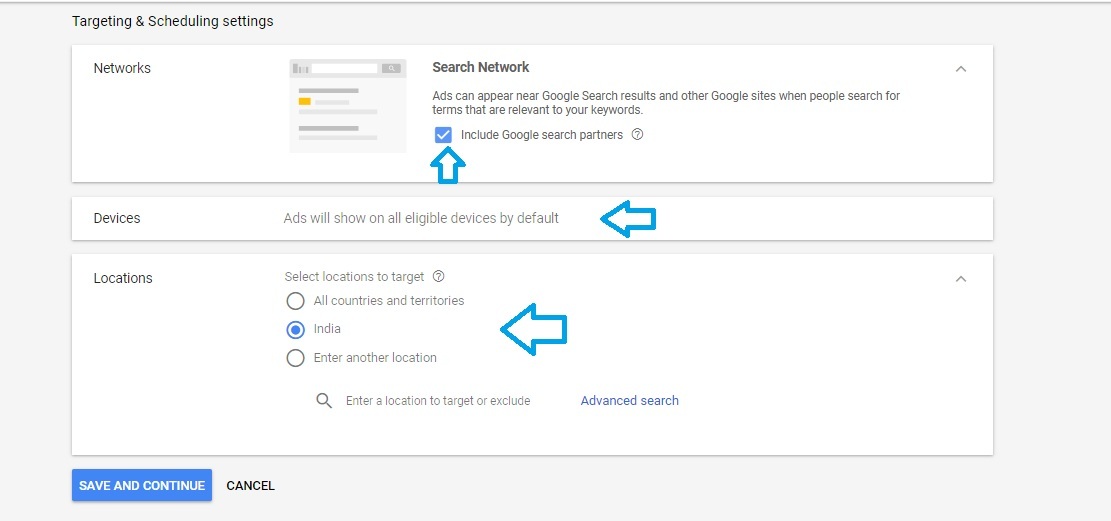
Targeting
By enabling “Search Networks”, your ads will appear next to Google search results and on other Google sites—Google Maps, YouTube, Alexa, etc.—when people search for your keywords. In the beginning, keep this option enabled as the CPC is lower than on Google Shopping. Also make sure to select the target audience where you want to display your ads.
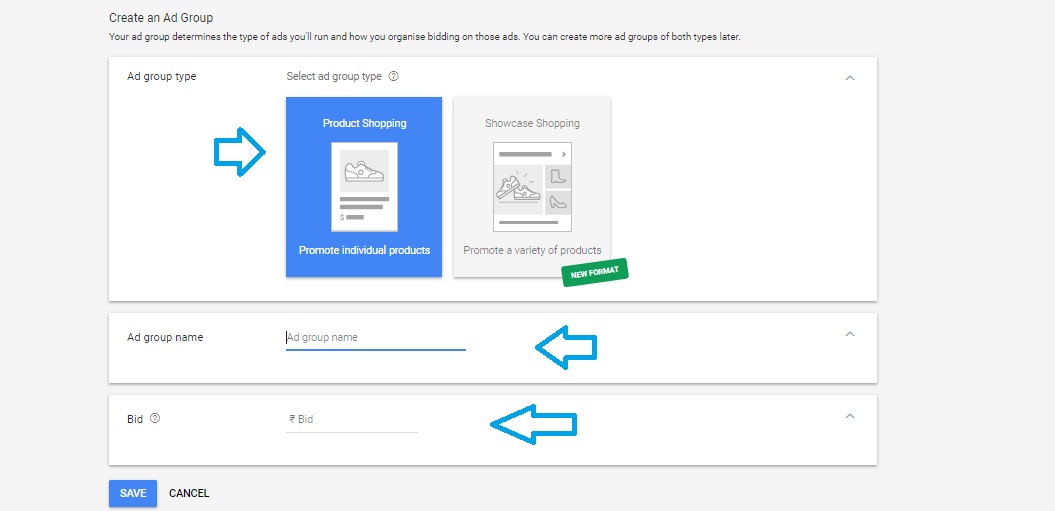
If you have multiple groups under the same campaign, name the ad group you just created to avoid confusion. The bid is the maximum cost-per-click (Max CPC) bid for the “All products” group in this ad group. You can divide this group into individual product groups and set specific bids for each of them.
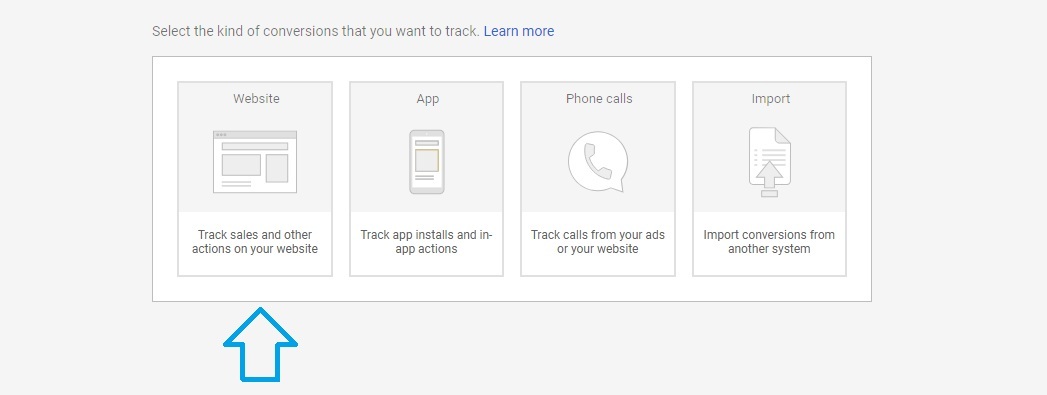
Setting up conversion tracking
To set up conversion tracking, click on “Tools” and “Conversion”.
Click on “Website” and follow the steps to set up conversion tracking.
Your campaign will now go live and start sending traffic to your website!
Section 7
Google Shopping Optimization
When running Google Shopping Ads, there’s a good chance you won’t get everything right the first time, even after referring to multiple resources for help. The good news is that you can always optimize your campaigns to increase your chances of success.
It’s important to optimize your campaign based on analytics to make Google Shopping Ads profitable for your business. You can pull up reports about how well your ads are performing from the “Dimension” tab in your shopping campaign.
Products with few or no impressions
If your products are not getting any impressions, your bids are likely lower than your competitors’. You should increase your bids and track the changes in performance.
There is also a chance that products with no impressions simply don’t have enough info for Google to fetch from your feed. Make sure you review your feed and update your product details such as descriptions and titles.
Products with high impressions and low click rates
If your products have high impressions but low click rates, you may have priced your product higher than your competitors’. You can check what ads your competitors are displaying for your search queries with the “Preview and Diagnostic” tool in AdWords. If your price is fine, then you may be using low-quality images, which won’t encourage potential customers to click on your Google Shopping Ads.
Products with high click rates and no conversions
If people are clicking your ads but not buying your products, there’s probably something wrong with your product page.
One easy way to fix this is by analyzing your competitors’ pages and seeing what makes them better than yours. Your competitors may have:
- Better product images
- More informative product descriptions
- More product reviews
- A free shipping option
- Promotional text
If your competitors aren’t the problem, your ads may simply be appearing for irrelevant search queries.
TSIM (a company that sells international SIM cards) encountered the same problem. They reported many clicks for queries like “SIM cards” and “China Mobile”. Once they figured out the problem, they added negative keywords to block unwanted search queries from triggering their ads.
Aside from checking your report in Google AdWords, you can check Google Analytics for data on your campaign that may help you optimize your Google Shopping Ads:
- Bounce rate
- Number of sessions
- Session duration
- New vs returning visitors
- Search queries
- Conversion tracking
Google Shopping Ads: A Launchpad for Sales
Google Shopping Ads are the most effective way to reach out to new customers, quickly generate sales, and create brand awareness. If you’ve just launched your store, no other medium can get you results as quickly as Google Shopping Ads can. In the long run, however, it’s not a good idea to rely entirely on ads. While running Google Shopping Ads, you should also work on getting organic traffic.
Campaigns on Google Shopping Ads require practice and persistence to get profitable results. Using the platform for the first time can be overwhelming, but once you hit that sweet spot, you’re sure to earn a significant ROI. Some merchants see an ROI as high as 1000%; there’s no reason you can’t do the same!